


Products
Solutions
Resources
Company
Many mobile apps need to exchange data with backend servers to provide rich experiences for their users. Any communication with remote servers today should use secure connections to protect the communication between the user and the server, which is usually done via the HTTPS protocol.
When implementing secure communications with HTTPS, you will typically use standard APIs provided by Android itself or well-known third-party libraries like OkHttp, which automatically take care of all the security-related aspects for you. For this reason, successfully establishing secure HTTPS connections from an Android app to a backend server is usually straightforward.
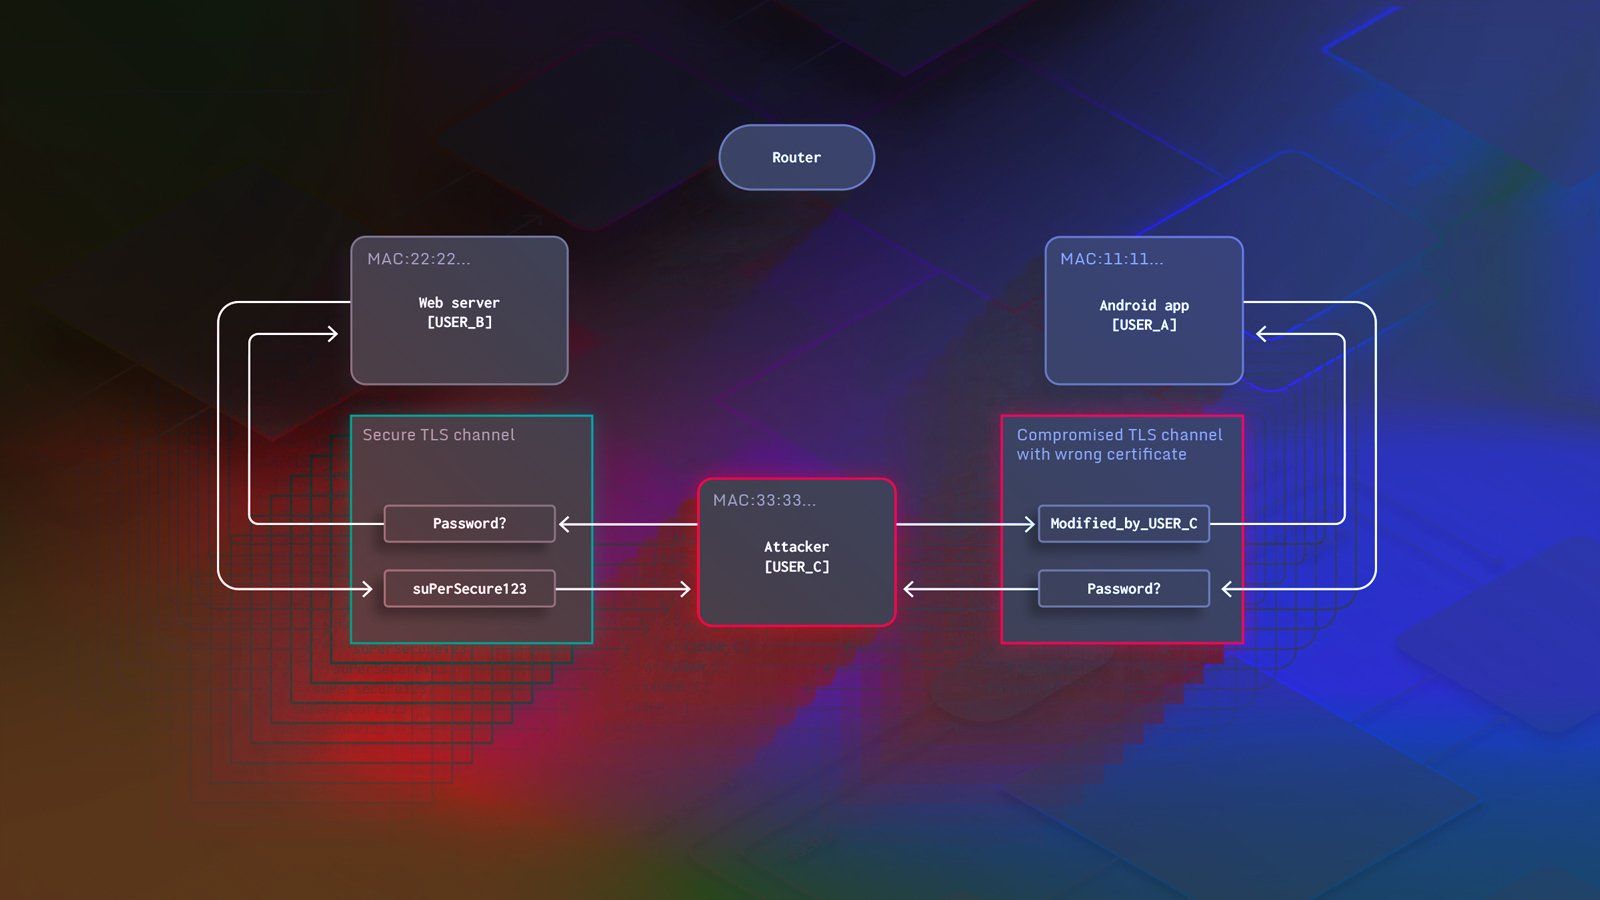
Sometimes you might need to deviate from the standard approach, however, if it doesn’t satisfy your needs. The security model of HTTPS relies on TLS certificates that are issued for each server by trusted certificate authorities (CAs). If you need to communicate with servers that only have access to certificates issued by custom CAs, then the default certificate checking mechanisms will refuse to accept them. Another reason for wanting to customize the certificate checking process may be to tighten the security level of your HTTPS connections by using certificate pinning or certificate transparency on Android.
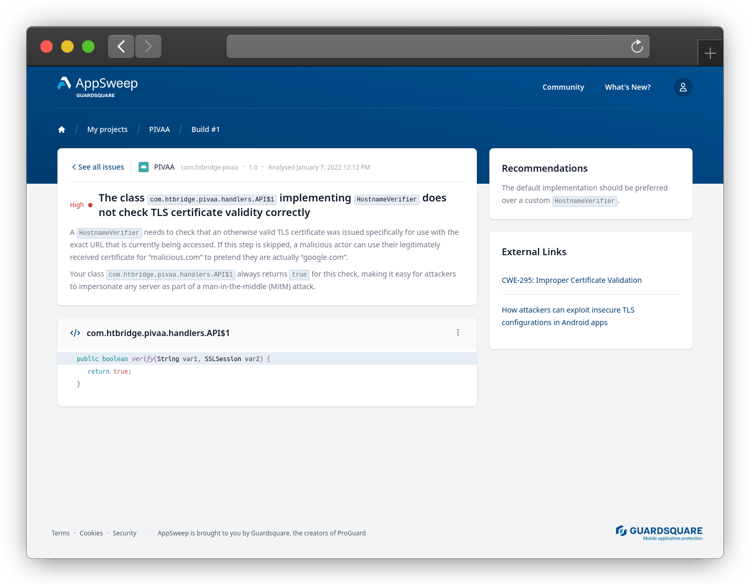
When evaluating data from our mobile application security scanning tool AppSweep, we discovered that apps frequently misconfigure TLS, with more than 33% of all scans containing issues related to certificate checking. No matter what your goal is, modifying the default TLS configuration in your Android app is not trivial, and any errors can introduce severe security issues.
In our previous blog post, we already covered common TLS configuration errors and how they can be exploited by malicious actors. So if you would like to find out more about this topic, feel free to explore that post before coming back here. By the way, we also updated the GitHub repository that contains the example setup we used to showcase potential attacks, to include the secure implementations presented in this post. Like this, you can see the difference they make when a malicious actor is trying to perform a man-in-the-middle attack.
Within the upcoming sections, we will explain how you can avoid these issues and secure your app in cases where you need to deviate from the default approach. We will cover the following use cases:
In Android 7.0 Nougat (SDK version 24), Google introduced a major change in the Android TLS trust infrastructure. The network security configuration feature provides several mechanisms that allow developers to easily tweak the certificate checking behavior to their needs, without having to manually adjust the implementation. One such feature is the ability to include additional trusted CAs, which can be enabled using the following XML code:
<?xml version="1.0" encoding="utf-8"?>
<network-security-config>
    <domain-config>
        <domain includeSubdomains="true">example.com</domain>
        <trust-anchors>
            <certificates src="@raw/my_ca"/>
        </trust-anchors>
    </domain-config>
</network-security-config>res/raw/my_ca.crt resource for any subdomain of example.com. This already fully covers the current use case, but there are several more aspects of TLS that can be tweaked using this feature. Consult the official documentation to see how your use case can be modeled. res/xml/network_security_config.xml) with your network security configuration. To activate it, yourAndroidManifest.xml will need to include it as follows:
<?xml version="1.0" encoding="utf-8"?>
<manifest xmlns:android="http://schemas.android.com/apk/res/android"
    package="..." >
    <application
        [...]
        android:networkSecurityConfig="@xml/network_security_config">
        [...]
    </application>
</manifest>
Unfortunately, the network security configuration feature is not available on SDK versions prior to version 24. The ideal solution would be to consider switching to a minimum SDK version of 24 to fully take advantage of this approach, which would help you avoid accidentally introducing vulnerabilities. According to statistics shown in Android Studio, approximately 89% of all Android devices currently run on SDK 24 or above, making this a feasible upgrade for most app developers.
If this is not possible for you, there is also an approach using a custom trust manager that works on older devices. This solution has been officially proposed by Google in the past, but since the introduction of the network security configuration feature it has vanished from the official documentation. This has left developers who are unable to switch to a newer SDK version wondering what they should do. Thus in this post, we will also show the code snippets needed to do so.
First, we need to create anX509TrustManagerinstance that knows about the certificate of our custom certificate authority. This trust manager can then be used to validate our server’s certificate and manually accept the custom CA certificate when establishing a TLS connection:
// Parse CA certificate from the res/raw/my_ca.crt resource
val cf = CertificateFactory.getInstance("X.509")
val caInput = BufferedInputStream(resources.openRawResource(R.raw.my_ca))
val ca = caInput.use {
    cf.generateCertificate(it)
}

// Create key store and insert the custom certificate
val keyStoreType = KeyStore.getDefaultType()
val keyStore = KeyStore.getInstance(keyStoreType)
keyStore.load(null, null)
keyStore.setCertificateEntry("custom_ca", ca)

// Add the default well known certificates as well
val tmfAlgorithm = TrustManagerFactory.getDefaultAlgorithm()
val defaultTmf = TrustManagerFactory.getInstance(tmfAlgorithm)
defaultTmf.init(null as KeyStore?)
defaultTmf.trustManagers.filterIsInstance<X509TrustManager>()
    .flatMap { it.acceptedIssuers.toList() }
    .forEach { keyStore.setCertificateEntry(it.subjectDN.name, it) }

// Create a new trust manager that uses this custom key store
val tmf = TrustManagerFactory.getInstance(tmfAlgorithm)
tmf.init(keyStore)HttpsUrlConnectionor inside a WebView), this trust manager then needs to be used in slightly different ways.
Retrieving data from a server is usually done by using aHttpsUrlConnection. To instruct the connection to use your new trust manager, you can use the following snippet:
val sslContext = SSLContext.getInstance("TLSv1.3")
sslContext.init(null, tmf.trustManagers, null)

val url = URL("https://www.my-domain.com")
val urlConnection = url.openConnection() as HttpsURLConnection
urlConnection.sslSocketFactory = sslContext.socketFactoryHttpsUrlConnection`s:
val sslContext = SSLContext.getInstance("TLSv1.3")
sslContext.init(null, tmf.trustManagers, null)

// Get a backup of the original socket factory to restore it on demand
val defaultSocketFactory = HttpsURLConnection.getDefaultSSLSocketFactory()
HttpsURLConnection.setDefaultSSLSocketFactory(sslContext.socketFactory)Setting the SSL socket factory is only possible forHttpsUrlConnection`s. When using WebView`sinstead, we have to modify theWebViewClient implementation for it to use the trust manager manually:
binding.webview.webViewClient = object : WebViewClient() {
    override fun onReceivedSslError(
        view: WebView?,
        handler: SslErrorHandler?,
        error: SslError?
    ) {
        if (error?.primaryError == SslError.SSL_UNTRUSTED) {
            try {
                val certField =
                    error.certificate.javaClass.getDeclaredField("mX509Certificate")
                certField.isAccessible = true
                val cert = certField.get(error.certificate) as X509Certificate
                tmf.trustManagers.forEach {
                    (it as X509TrustManager).checkServerTrusted(arrayOf(cert), "generic")
                }
                handler?.proceed()
            } catch (e: Exception) {
                handler?.cancel()
            }
        } else {
            handler?.cancel()
        }
    }
}
The notable part of this code snippet is the try-catch statement that is executed when the reported SSL error isSSL_UNTRUSTED: This is exactly the situation that will arise when the server presents its certificate that has been issued by a custom certificate authority. Thus, we have to check if our custom trust manager accepts the server certificate.
Note that in order to check the server certificate using the trust manager, we need its original X509 form. This is a problem because the SSL error only allows us to officially retrieve this data starting with SDK version 29. Below that, we are forced to use reflection in order to access the X509 certificate using an internal API. This is another reason why we strongly advise you to switch to SDK 24 and use the dedicated network security configuration.
Certificate pinning can also be configured within the network configuration file. You can instruct your application to verify that the provided certificate chain contains at least one certificate that is trusted explicitly when establishing a connection to your target server. These trusted certificates are identified by providing the hash value of their public key. The key digest can be extracted from yourcert_to_pin.crtusing the following OpenSSL command:
openssl x509 -noout -pubkey -in cert_to_pin.crt | openssl pkey -pubin
-outform der | openssl dgst -sha256 -binary | openssl enc -base64
It is advisable to include a backup key in case the pinned certificate expires before the Android app can be updated.
<?xml version="1.0" encoding="utf-8"?>
<network-security-config>
    <domain-config>
        <domain includeSubdomains="true">example.com</domain>
        <pin-set>
            <pin digest="SHA-256">7HIpactkIAq2Y49orFOOQKurWxmmSFZhBCoQYcRhJ3Y=</pin>
            <!-- backup key -->
            <pin digest="SHA-256">fwza0LRMXouZHRC8Ei+4PyuldPDcf3UKgO/04cDM1oE=</pin>
        </pin-set>
    </domain-config>
</network-security-config>
The technique of creating a custom trust manager, which we saw in the section about supporting custom CAs in older SDK versions, can also be used to implement certificate pinning on Android. If you recall, this step adds the certificates that are stored in the default key store:
// Add the default well known certificates as well
val tmfAlgorithm = TrustManagerFactory.getDefaultAlgorithm()
val defaultTmf = TrustManagerFactory.getInstance(tmfAlgorithm)
defaultTmf.init(null as KeyStore?)
defaultTmf.trustManagers.filterIsInstance<X509TrustManager>()
    .flatMap { it.acceptedIssuers.toList() }
    .forEach { keyStore.setCertificateEntry(it.subjectDN.name, it) }
If we leave this out and only add our custom certificate to the key store, the resulting trust manager will also exclusively accept this certificate as the root of trust. Any certificate signed by a different CA will be rejected, which is exactly what we want to achieve with certificate pinning.
While you can use such a custom trust manager to achieve certificate pinning inHttpsUrlConnection`s, switching to well known third party libraries such as OkHttp might be easier in this case. They typically provide more easily customizable options to enable certificate pinning, e.g. pinning a public key instead of a full certificate. In the following example we will be using OkHttp to demonstrate how to perform certificate pinning. Setting up other libraries to use certificate pinning should be similar.
First, you need the public key fingerprints of the certificates you want to pin. The easiest way to retrieve these is to use the following OpenSSL command, as mentioned earlier:
openssl x509 -noout -pubkey -in cert_to_pin.crt | openssl pkey -pubin
-outform der | openssl dgst -sha256 -binary | openssl enc -base64
Then, you can instantiate an OkHttp client that enforces the pinning of these fingerprints:
val pinner = CertificatePinner.Builder()
    .add("*.example.com", "sha256/7HIpactkIAq2Y49orFOOQKurWxmmSFZhBCoQYcRhJ3Y=")
    .add("*.example.com", "sha256/fwza0LRMXouZHRC8Ei+4PyuldPDcf3UKgO/04cDM1oE=")
    .build()
val httpClient = OkHttpClient.Builder()
    .certificatePinner(pinner)
    .build()
Establishing a connection using this client is straightforward:
val url = URL("https://www.example.com")
val request = Request.Builder().url(url).build()
val response = httpClient.newCall(request).execute()For certificate pinning,WebView`sagain make the situation more complicated. Instead of overriding theonReceivedSslErrormethod, yourWebViewClientneeds to have a custom implementation forshouldInterceptRequest. This method is called before the WebView performs the request, so this is the place where you can choose to execute it in a different way, completely skipping the internal WebView request logic.
In our case, we perform a manual request that performs certificate pinning while the connection is being established. Based on an example project on GitHub, the following snippet shows how thehttpClientobject we built in the previous section can also be used inside aWebView:
binding.webview.webViewClient = object : WebViewClient() {
    override fun shouldInterceptRequest(view: WebView,
                                        interceptedRequest: WebResourceRequest)
      : WebResourceResponse {
        try {
            val url = URL(interceptedRequest.url.toString())
            val request = Request.Builder().url(url).build()
            val response = httpClient.newCall(request).execute()

            val contentType = response.header("Content-Type")

            if (contentType != null) {
                val inputStream = response.body?.byteStream()
                val mimeType = ContentTypeParser.getMimeType(contentType)
                val charset = ContentTypeParser.getCharset(contentType)

                return WebResourceResponse(mimeType, charset, inputStream)
            }
        } catch (e: Exception) {
           return WebResourceResponse(null, null, null)
        }

        return WebResourceResponse(null, null, null)
    }
}
The important point here is that in case theshouldInterceptRequestmethod is overridden, we need to perform the whole process of establishing the connection and retrieving the HTML response data ourselves. This is why we need additional logic for decoding the content from the raw response, which you can find here.
Note that if anSSLPeerUnverifiedExceptionoccurs, the server has presented a certificate chain that doesn’t match your set of pinned certificates. Even in this case, you need to make sure to return an emptyWebResourceResponse, as returning null instructs theWebViewto perform the request itself, circumventing your intended certificate pinning.
As you can see, the whole process of adding certificate pinning to aWebViewis quite messy and far from trivial. Unfortunately, it’s also not a complete solution, as theshouldInterceptRequestmethod is only used for GET requests. So if you need to display websites that need to use POST requests, certificate pinning cannot be enforced in these cases. The only complete way to enforce pinning is to use the often mentioned network security configuration feature. Thus, if you want to tighten your WebView security, we strongly recommend upgrading to SDK 24.
Certificate transparency (CT) is another technique invented by Google that can be used to tighten the security of the certificate chain of trust model. Unlike certificate pinning, this technique is only available for certificates issued by well-known CAs. So if you have to use custom certificates, your only choice is to harden TLS connections with certificate pinning.
Certificate transparency requires CAs to publicly log which certificates they issue for which domains. These logs are cryptographically ensured to be tamper-proof and web clients can verify if a server’s certificate has actually been added to the log. If it is present there, this means that the certificate was issued by a trusted CA and the client can safely proceed with the connection.
As a bonus, due to the fact that everyone is able to verify which certificates have been issued, you can identify attackers targeting your domain that have access to any trusted CA, which is something that is not possible with certificate pinning. While your app is able to detect wrong certificates with certificate pinning, attackers may be able to prevent the device from alerting you remotely about any security issues.
Another benefit over certificate pinning is that you won’t need to update your app when a new certificate has been issued because this will automatically be added to the public log. To learn more about the technical details of certificate transparency, visit the official website.
Unfortunately, the Android framework doesn’t currently support certificate transparency out of the box. This is why you will need to use third-party libraries to implement certificate transparency.
Android certificate transparency using third-party libraries inherently has the same limitations as certificate pinning when it comes to the use ofWebView's. TheshouldInterceptRequestmethod needs to be overridden for the approach to work, and this method is only used for GET requests. Thus, should you want to tighten Android TLS security in a WebView, your only reliable option is to use certificate pinning via the network security configuration feature on SDK 24 or above.
While you should always try to use standard approaches for security-related configurations in your app, there are some situations where you might want to do something that can’t be achieved that way. In this post, we saw two use cases where the default Android TLS configuration might not suffice:
If you are using SDK 24 and above, the Android framework provides you with a toolkit to easily support these use cases. The network security configuration feature lets you add custom certificates to the key store and also provides the ability to enforce certificate pinning.
Unfortunately, many app developers currently still support older versions of the Android SDK and cannot use this convenient feature. That means they have to rely on manual workarounds, which are much more prone to human error than the network security configuration feature. If any bug is present in code related to the custom certificate checks, this can open the door for attackers. As a result, the preferred solution is to upgrade to newer SDK versions to benefit from all new security features.
Of course, it is difficult to manually keep up with all possible security issues that might be present in your app’s code base. This is where automated security testing tools like AppSweep can help you out. Automatically scanning your application for the presence of different types of known vulnerable code patterns can make you aware of security issues that you didn’t even know existed. For example, you could know that connections to web servers should use encrypted HTTPS channels, but protocol subtleties like the correct certificate checking process are not known to everyone.
Another benefit of a tool like AppSweep is that it not only alerts you about specific issues in your code, but also provides more context, explaining why exactly this is a problem and what can be done to fix it. This actionable feedback is crucial for developers to not only understand potential issues but also to actively improve the security posture of their Android apps. To learn more about the benefits of AppSweep, scan your app for a free application security testing.