


Products
Solutions
Resources
Company

It probably won’t come as a surprise to you if I stated that most applications nowadays use network communication in some way or another. From video conferencing calls to online payments, all of these seemingly mundane tasks require the application on your iPhone to interact with a server. Keeping the information that is sent over the internet secure is of paramount importance for both businesses and their end-users.
In this article, we will take a look at the new, simplified way of certificate pinning, or SSL pinning, Apple added to iOS. We will examine how to use it, tamper with it and make it more secure. A quick refresher about how SSL pinning in iOS works is provided in Appendix I at the bottom of this blog.
Even though pinning the certificate or public key inside an application is nothing new on iOS, Apple hasn’t provided a simple way of doing this yet. Third party libraries like AlamoFire, TrustKit and AFNetworking are the norm when it comes to performing pinning. To make it easier for developers to use pinning, Apple has made it readily available, requiring only a few changes inside the app’s Info.plist file. This property list file contains information and settings the app uses at runtime.
So how does it work concretely? Let’s go through a simple example for an imaginary app that we will call MyGS. The MyGS app needs to communicate with the guardsquare.com server to retrieve some sensitive information. To avoid a man-in-the-middle attack, we will use certificate pinning.
In the next few paragraphs, we will illustrate how to configure certificate pinning with the Info.plist step by step. First, let’s have a look at the guardsquare.com certificate chain and which certificate we should pin. Next, we will export a certificate. Then we will extract the public key from the certificate we wish to pin and convert it into the correct format. Finally, we will perform the actual pinning step and embed everything inside the Info.plist. We will also provide a small code sample and a screenshot to show how to handle errors.
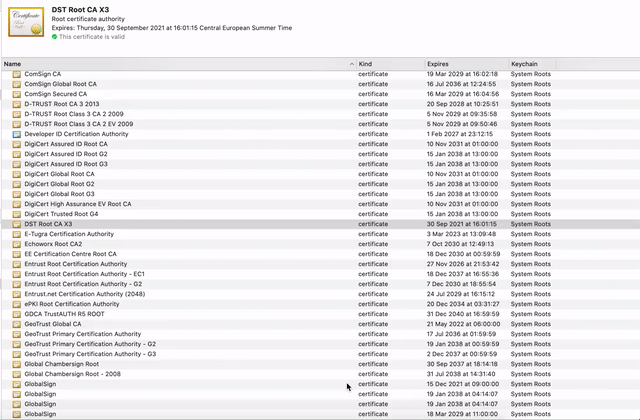
In this step, we will visualize what the chain of trust looks like for guardsquare.com. There are multiple ways to do this. The most trivial one is to use a browser. In Google Chrome you can simply click on the lock in the address bar and then click on certificate. This will give the following information:

Another way to retrieve the same information is to use the openssl command line tool and invoke the following command:
openssl s_client -showcerts -servername guardsquare.com -connect guardsquare.com:443This gives the same result:
depth=2 O = Digital Signature Trust Co., CN = DST Root CA X3
verify return:1
depth=1 C = US, O = Let's Encrypt, CN = R3
verify return:1
depth=0 CN = guardsquare.com
We can see that the certificate chain has a depth of 3. At depth 0, we can find the guardsquare.com leaf certificate and at depth 2 we can see the root certificate issued by a certificate authority (CA).
In this example, we will proceed by pinning the root certificate: DST Root CA X3.
In this step, we will export the root certificate in .pem format from the keychain on macOS. On other operating systems the root certificates are stored in different ways, but the idea remains the same.
To export it from the keychain you can follow the steps in this video
We now have a certificate in .pem format and can move on to the next step.
Next, we need to extract the public key from the certificate. This can be achieved using the following command:
openssl x509 -pubkey -in DST_Root_CA_X3.pem -noout > DST_Root_CA_X3.pubkey.pemNow we have the public key in .pem format, but the Info.plist certificate pinning fields expect a digest of the certificate’s subject public key infrastructure. Simply put, it requires an SPKI-SHA256-BASE64 string. To create the digest in this format, you can use the following command:
openssl pkey -in DST_Root_CA_X3.pubkey.pem -pubin -inform pem -outform der \
  | openssl dgst -sha256 -binary | openssl enc -base64
This will give the following result:
Vjs8r4z+80wjNcr1YKepWQboSIRi63WsWXhIMN+eWys=
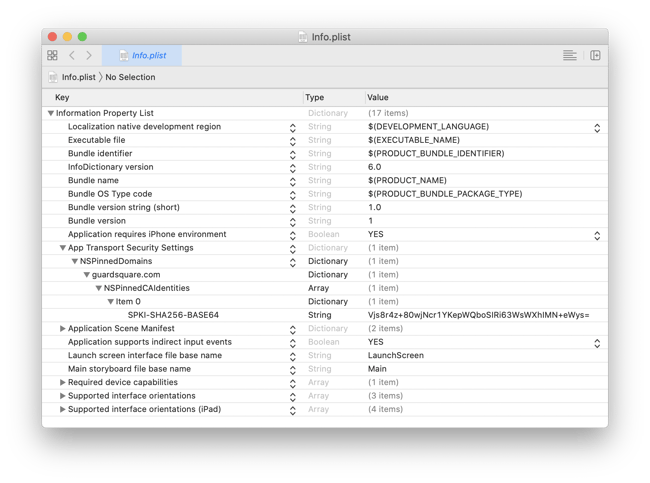
The SSL pinning information can be specified in the Info.plist under NSPinnedDomains. Multiple domains can be specified for this key. Every domain can then specify NSPinnedCAIdentities and NSPinnedLeafIdentites. The former field allows you to specify identities of root certificates like DST Root CA X3. The latter field allows you to specify identities of leaf certificates like that of guardsquare.com.
In our case, we will pin the root certificate by adding the public key digest that we obtained in the previous step to the NSPinnedCAIdentities field. You can see the final Info.plist result in the following screenshot:
That’s it! The MyGS app now has certificate pinning enabled for the guardsquare.com’s root CA. It will check whether the root certificate used is the DST Root CA X3 one.
To access the domain, the code will look more or less like it does in the following snippet. As you can see, it is important to put the correct error handling in place (see video below). Failing to do so might result in a crash because of an unhandled exception.
guard let imageUrl = URL(string:
"https://guardsquare.com/sites/saikoa.com/themes/itr_theme/images/dest/logo.png") else {
return
}
// URL session that doesn't cache.
let urlSession = URLSession(configuration: URLSessionConfiguration.ephemeral)
let task = urlSession.dataTask(with: imageUrl) { imageData, response, error in
DispatchQueue.main.async {
// Handle client errors
if let error = error {
self.HandleClientConnectionError(error: error)
return
}
// Handle server errors
guard let httpResponse = response as? HTTPURLResponse,
(200...299).contains(httpResponse.statusCode) else {
self.HandleServerError(response: response!)
return
}
self.AddImageToView(imageData: imageData!)
}
}
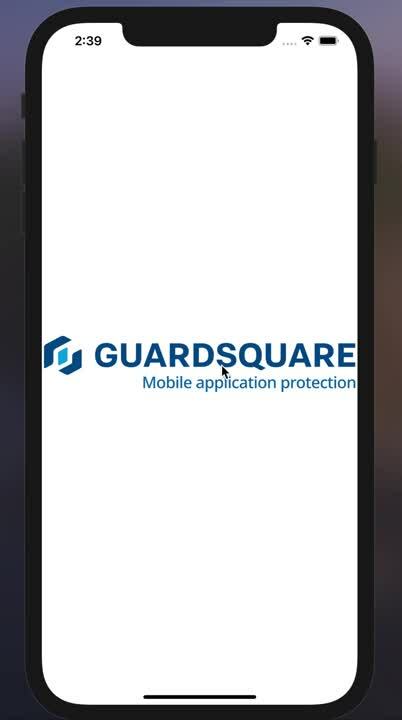
task.resume()Connection succeeds with SSL pinning in iOS:
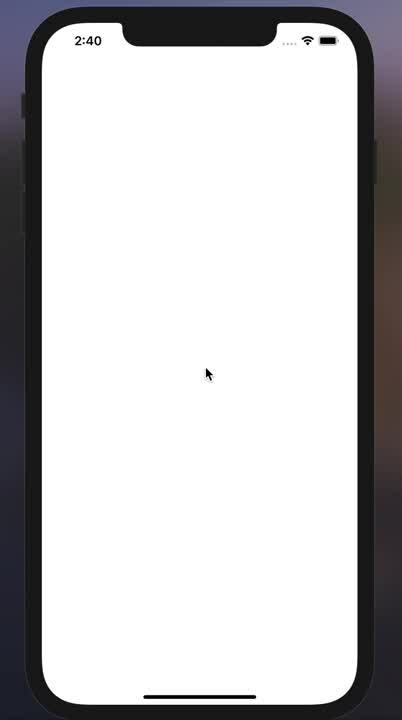
Connection fails due to SLL pinning in iOS:
“How hard would it be to just remove the pinning information from the Info.plist?” This is the question that might have crossed your mind while reading this article. In this section, we will undo the Info.plist pinning using two different techniques.
Keep in mind that no single protection technique is bulletproof; a combination is always the better approach. The steps below are easy and effective due to a lack of additional code hardening or runtime checks.
With this technique, we will remove the certificate pinning information from the Info.plist of the app bundle and subsequently repackage the app.
The first step consists of getting our hands on the application bundle. This can, for instance, be done by using a jailbroken device and the bagbak tool.
Unzip the IPA using the following command:
unzip -d MYGS MyGS.ipaOpen the Info.plist in Xcode:
open GS/Payload/MyGS.app/Info.plistNext, remove the NSPinnedDomains key from the Info.plist by clicking on the minus and save the file.
Next, we have to repackage the app bundle again:
zip -r UnpinnedGS.ipa GS/PayloadiOS apps are cryptographically signed. Since we tampered with the application’s contents, we have to resign the app in order to be able to successfully install it. This can easily be achieved with a resigning tool, such as iOS App Signer, iResign or zsign. Here you go; you now have an app whose certificate pinning info was stripped.
While the first technique defeats Apple’s pinning implementation in a very trivial way, it is more involved than necessary. Instead of modifying the Info.plist file directly, we could also modify its representation once the application has read it into memory. To do this, we will use the popular hooking tool named Frida.
The Info.plist is read into memory at the start of the application. Accessing the memory representation of the Info.plist can be done using the infoDictionary method of NSBundle. The plist is represented as an NSMutableDictionary, and it is just a matter of removing the NSPinnedDomains key from it to bypass certificate pinning.
To do this, start Frida and specify the bundle ID of the application.
frida -U -f <bundle-id> --no-pauseNext, execute the following one-liner in the Frida command line interface to remove the certificate pinning information.
ObjC.classes.NSBundle.mainBundle()
    .infoDictionary()
    .valueForKey_("NSAppTransportSecurity")
    .removeObjectForKey_("NSPinnedDomains")
We’ve now removed the pinning information. Any certificate can now be used to perform a man-in-the-middle attack.
Luckily, some solutions exist to make tampering with the app more complex.
The first technique we presented relied on modifying the Info.plist inside the app bundle. This violates the integrity of the package and voids its signature. You might think that voiding the signature prevents this kind of tampering. But like we showed, resigning an app is straightforward – in essence making it ineffective. An effective way to mitigate this is by performing checks to verify the integrity of the package at runtime. This way, we can make sure that its contents have not been tampered with. Provided that these checks are spread across the app, they are harder to remove or work around.
The inline hooking technique requires Frida to attach to the app’s process. The app would be better protected if it could prevent hooking, or at least detect it. Based on what it detected, it could then decide to either print a warning to the user, disable certain features in the app or simply stop its execution.
Checking for a compromised environment is also very essential. An environment that is compromised by a jailbreak can allow a reverse engineer to circumvent other detection methods used to detect Frida.
The measures and techniques explained in OWASP’s iOS Anti-Reversing Defenses document are a good starting point. This document provides information on both jailbreak detection and debugger detection methods. Another open source framework that you can use is the iOS Security Suite.
Apple added a new way of configuring identity pinning through the Info.plist file. Although this new configuration method is very simple to add to your project, we showed that – like all security measures – it’s not enough on its own. Without extra protection measures, it is fairly easy to bypass and adds very limited value from a security perspective.
Our advice would be to use Apple’s certificate pinning in Info.plist, but to always pair it with extra measures of protection and obfuscation. It is important to remember that combining multiple protection methods will make it extra challenging for reverse engineers, keeping your apps safer.
TLS is a protocol that ensures the communication between two parties (e.g. an iPhone and a server) stays private and that data integrity is maintained. To achieve this, the TLS protocol relies on a specific handshake. Although we won’t go over the complete handshake in full detail, we will have a closer look at the part that is important for this article.
For an app to confirm the authenticity of the server, the handshake relies on the server sending a chain of one or more certificates. The root certificate of this chain is shipped with the operating system of the device and used to check the validity of the rest of the received certificates. In normal circumstances, the root certificate is delivered by a trusted entity, namely a certificate authority. However, there is a caveat here. A malicious user could add his or her own root certificate to the iOS device. This will allow a malicious user to perform a man-in-the-middle attack (MITM). In this kind of attack, the malicious user will intercept the traffic and make the two other parties in the transaction believe they are directly communicating with each other, while in fact, the malicious user will have negotiated a secure TLS connection with both parties.
To prevent a malicious user from using his or her own certificates, you can apply another layer of security. To guarantee that only certificates issued to the app developer are used during the TLS handshake, the certificates or their public keys can be pinned. Pinning means that the public key of the certificates received from the server are checked against public keys embedded inside the application. Consequently, in order to have a successful connection, a specific certificate will have to be used in addition to the chain of trust being valid. Pinning makes MITM attacks more difficult to execute, resulting in a more secure communication between the application and the server.