


Products
Solutions
Resources
Company
The internet provides ample resources for developers or development teams who want to implement security measures against reverse engineering and tampering in their mobile applications. There are blog posts, guides, tutorials, etc. that dispense guidance to developers looking to build their in-app defenses from the ground up. Additionally, there are a number of open source security libraries developers can integrate in their applications to secure them.
The problem with these DIY security implementations, in addition to the difficulty of maintaining them, is that, in general, they only offer limited protection. A recent survey of 1300 App Store applications shows that most of the top applications use some form of runtime application self-protection (RASP), but only implement easy-to-bypass protection, leaving the apps vulnerable to reverse engineering and tampering.
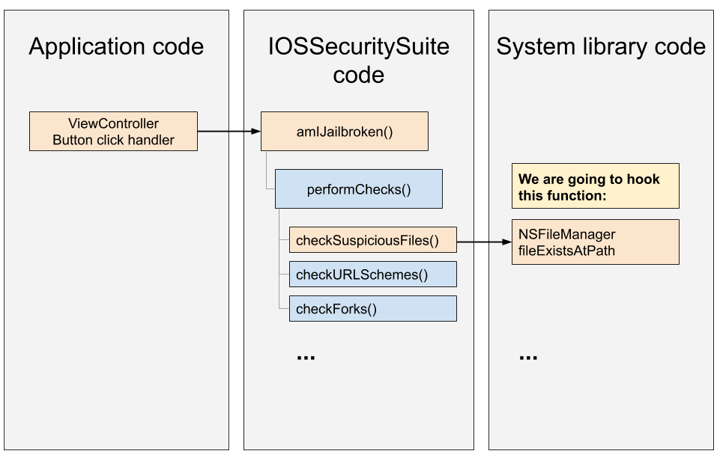
In this blog, we discuss two different attack scenarios that are likely to defeat any DIY security solution. We use a sample application protected with IOSSecuritySuite, a much-used open source anti-tampering library, to illustrate how easily DIY security solutions can be bested and show how dynamic analysis and hooking (using Frida) can be used to defeat the jailbreak detection provided by the anti-tampering library. The described attack scenarios are equally effective for bypassing the other anti-tampering protections provided by IOSSecuritySuite, including debugger and emulator detection.
To make use of IOSSecuritySuite, app developers need to add the anti-tampering library to their project and implement calls to specific IOSSecuritySuite methods to the code they want to protect. Once implemented, the jailbreak detection provided by IOSSecuritySuite performs several simple heuristics:
If at least one of these checks fails, the anti jailbreak solution returns a flag developers can use to either terminate the application or select a different execution path.
The overall setup has two apparent weaknesses, making an iOS SecuritySuite bypass possible. First, the security checks are centralized, which means that it is sufficient for an attacker to patch the code in one place to remove all of the security mechanisms. In this case, the good coding practice of separating concerns renders applications more vulnerable. Secondly, this specific anti-tampering library is an open source solution. This means a reverse engineer can analyze the source code of the library to understand how it works. The last point is a lesser disadvantage since it is often trivial to gain insight into the functioning of implemented security mechanisms by decompiling the application - unless its code is obfuscated.
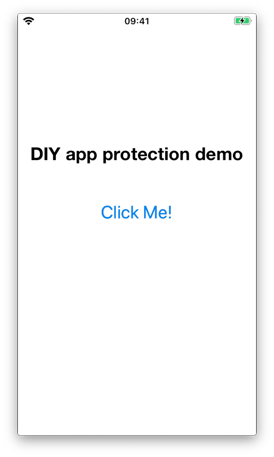
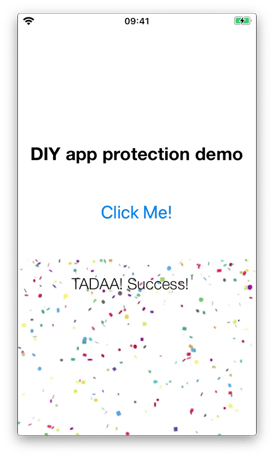
We will present two different attack scenarios that can be followed to circumvent IOSSecuritySuite’s anti jailbreak solution using a Swift sample app protected by the anti-tampering library. The main screen of the sample app shows a ‘Click me’ button. When clicked, the application displays a security warning when it is running on our jailbroken device.

The attacks will be performed with Frida, a dynamic analysis, hooking and code tracing framework. We will use two different methods:
Both methods will be executed in two steps:
1. Find the function that performs the jailbreak check
The methods we are demonstrating do not rely on the presence of identifiers in the source code, unlike the jailbreak bypassing method used here. This means they are also effective in applications that have been obfuscated using open source or DIY solutions to hide semantic information in the code.
2. Override the checking function’s return value so that the checks are ignored and the result is always ‘passed’.
In this scenario, we use system library hooking to find the jailbreak detection method. Then, we patch the detection method using Frida’s Interceptor API to make sure it always successfully passes.
We start by targeting the check for suspicious files by hooking NSFileManager.fileExistsAtPath() because we know, based on our analysis of the IOSSecuritySuite source code, the check function calls this method. Then, unwinding the call stack, we locate the amIJailbroken() checking function that we have to patch to bypass the jailbreak check.
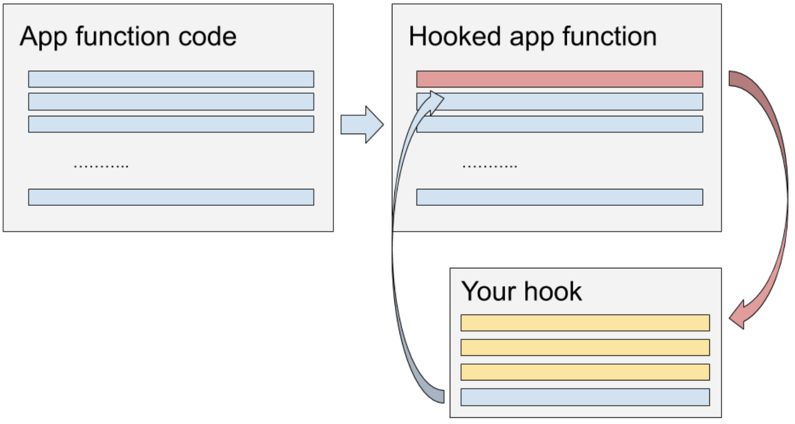
In order to make the hook work, Frida’s Interceptor API patches the function code in memory so that it passes control to the hook. The hook can now execute any logic, for example printing the stack trace. Once the hook completes, it passes control back to the original function. The figure below shows how the original function code is updated so that it invokes the hook and how control is passed back to the original function afterward.
First, we hook the system library function and print the stack trace.
Interceptor.attach(ObjC.classes.
  NSFileManager['- fileExistsAtPath:'].implementation,
{
    onEnter: function (args) {
	const fname = ObjC.Object(args[2]).toString();
	if (fname.indexOf('frida') >= 0) {
        	console.log('NSFileManager.fileExistsAtPath', fname);
        	console.log(Thread.backtrace(this.context, Backtracer.ACCURATE)
        		.map(DebugSymbol.fromAddress).join('\n') + '\n');
	}
    }
});
Clicking the ‘Click Me!’ button now provides us with the call stack:
NSFileManager.fileExistsAtPath /usr/sbin/frida-server
0x1026a5bc0 re-blog-1-storyboard!0xdbc0
0x1026a419c re-blog-1-storyboard!0xc19c
0x10269e66c re-blog-1-storyboard!0x666c
0x10269ebe8 re-blog-1-storyboard!0x6be8
0x1c6112e50 UIKitCore!-[UIApplication sendAction:to:from:forEvent:]
...
The top stack frames represent the functions where the check is taking place. Since we analyzed the source code of IOSSecuritySuite, we know that we are looking for the performChecks() function, listed as re-blog-1-storyboard!0xc19c in the stack trace. But even if we hadn’t, we would only have to inspect four different functions to find the correct one.
The re-blog-1-storyboard!0xc19c point is somewhere in the middle of the function and our next step is to find the function’s starting address. To do so, we inspect the instruction that called the function. In the stack trace, the next frame points to 0x10269e66c re-blog-1-storyboard!0x666c. This is the return address and the calling instruction is located four bytes earlier.
Here’s how to inspect the instruction right before 0x10269e66c.
console.log(Instruction.parse(ptr(0x10269e66c - 4)).toString());This presents us with the calling instruction mnemonic:
bl #0x1026a4054Now the only thing left to do is to hook this function to override the return value.
/* Substitute the address here with one obtained at the previous step */
Interceptor.attach(ptr('0x1026a4054')), {
   onLeave: function(retval) {
   	retval.replace(1);
  }
});
Clicking the ‘Click Me!’ button on the application’s main screen, shows that we have successfully bypassed the jailbreak check:
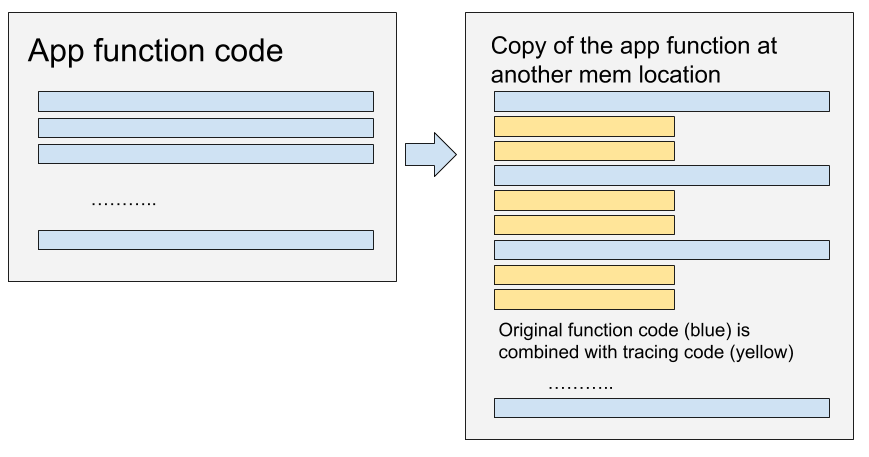
In the second scenario, we are using Frida’s Stalker API to bypass the jailbreak check without touching the critical functions in memory. Since the functions are preserved in memory in their original state, this kind of attack wouldn’t trigger implemented hook detection mechanisms.
Stalker is a code tracer based on dynamic recompilation. It copies code instructions to another location in memory where they are adjusted to account for the new location and include additional tracing instructions. If an application inspects its code at the original location, it will find that the code is perfectly intact because it is the copy of the code that is being tampered with.
The figure below shows how a function is transformed at its new memory location to include code tracing.
We are using code tracing to trace the jailbreak check’s execution path without modifying the original function. Then, we use Frida’s Stalker mode to dynamically alter the detection code to change the result of the jailbreak check to TRUE.
We start by creating a trace of the application using the Stalker API.
var found_at = -1;
const tid = Process.getCurrentThreadId();

/* First we will attach to a harmless UI function using Interceptor API This step is only needed to narrow down our search, and is not required for the methodology to work */
Interceptor.attach(ObjC.classes['UIApplication']
  ['- sendAction:to:from:forEvent:'].implementation, {
  onEnter: function(args) {
    var tid = Process.getCurrentThreadId();
    this.tid = tid;
    console.warn('onEnter ', tid);

    /* Trace the thread with Stalker */
    Stalker.follow(tid, {
      events: { call: false, ret: false, exec: false, block: false, compile: true },

      onReceive: function(events) {
        if (found_at != -1) return;
        events = Stalker.parse(events);

        for (var i = 0; i < events.length; i++) {
          const ev = events[i];
          const target = ev[2];
          const symbol = DebugSymbol.fromAddress(target);

          /* This code will highlight the fileExists call in the stack */
          if (!!symbol && !!symbol.name && (symbol.name.indexOf('fileExists') >= 0)) {
            console.warn('fileExists');
            found_at = i;
            break;
          }

          /* This code will display a frame that belongs to our module */
          if (!!symbol && !!symbol.moduleName && !!symbol.name &&
              (symbol.moduleName.indexOf('blog-1-storyboard') >= 0) &&
              (symbol.name.indexOf('DYLD-STUB') < 0)) {
            console.log(symbol);
          }
        }
      }
    });
  },
  onLeave: function(retval) {
    console.warn('onLeave ', this.tid);
    Stalker.flush();
    Stalker.unfollow(this.tid);
    Stalker.garbageCollect();
  }
});
This returns a long stack trace containing the same calling instruction (at 0x66c - 4) we found in the first scenario.
0x1026a532c re-blog-1-storyboard!0xd32c
0x10269e66c re-blog-1-storyboard!0x666c  // <- The call we are looking for
0x1026a4098 re-blog-1-storyboard!0xc098
0x1026a40c0 re-blog-1-storyboard!0xc0c0
...
0x1026a5bc0 re-blog-1-storyboard!0xdbc0
fileExists
We inspect the calling instruction in a similar way as in attack scenario 1:
console.log(Instruction.parse(ptr(0x10269e66c - 4)).toString());and get the following result:
bl #0x1026a4054The final step is to override the function result without patching it in memory at its original location. We are using Stalker’s transform callback and Arm64Writer to execute additional logic to override the function return.
const startAddress = Module.findBaseAddress('re-blog-1-storyboard').add(ptr('0xc054'));
const endAddress = Module.findBaseAddress('re-blog-1-storyboard').add(ptr('0xc560'));
Interceptor.attach(ObjC.classes['UIApplication']
['- sendAction:to:from:forEvent:'].implementation, {
onEnter: function(args) {
var tid = Process.getCurrentThreadId();
this.tid = tid;
console.warn('onEnter ', tid);
Stalker.follow(tid, {
events: {call: true, ret: false, exec: false, block: false, compile: false},
onCallSummary: function(summary) {},
/* This time we will use transform callback, which allows us to alter the instructions dynamically. */
transform: function(iterator) {
var instruction = iterator.next();
if (instruction == null) return;
const our_function = (instruction.address.compare(startAddress) >= 0) && (instruction.address.compare(endAddress) <= 0);
if (!our_function) {
iterator.keep();
while (iterator.next() !== null)
iterator.keep();
return;
}
console.warn('We are inside amIJailbroken()!');
do {
/* If we detect that we are inside amIJailbroken() function, we trace the execution until the ret instruction. When we find ret, we add two more instructions to override the result to 1. */
if (instruction.mnemonic === 'ret') {
console.log('Overriding return');
iterator.putSubRegRegReg('x0', 'x0', 'x0');
iterator.putAddRegRegImm('x0', 'x0', 1);
}
iterator.keep();
var instruction = iterator.next();
} while (instruction != null);
}
});
},
onLeave: function(retval) {
console.warn('onLeave ', this.tid);
Stalker.unfollow(this.tid);
Stalker.garbageCollect();
}
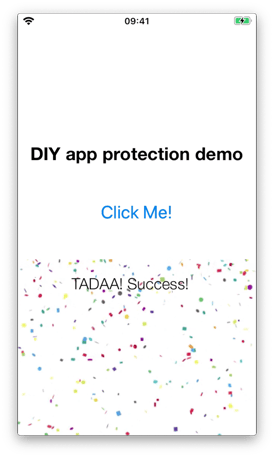
});This method bypasses the jailbreak check without patching any critical application functions in memory:
Malicious actors can use a wide rage of advanced methods to circumvent DIY security measures in iOS applications - two of which we have discussed in this blog. Modern dynamic instrumentation tools like Frida make it easy to perform these attacks and leave applications vulnerable to reverse engineering and tampering.
It takes significant and ongoing effort to implement reliable application protection that effectively protects against advanced attacks. iXGuard, our security solution for iOS applications, helps app developers integrate advanced security measures into their applications in a time-effective manner. It provides protection that avoids all the common pitfalls we have exploited in this blog:
